If you want to showcase your product or service in the best possible way, working with a professional video agency will always deliver the best results. The right team brings expertise, storytelling, and production value that’s hard to replicate.
But not everyone has the budget for that on every piece of content, especially if you’re creating high volumes for social media or internal use. The good news? You can still produce engaging, useful videos yourself, with a bit of planning and a few smart tricks.
Here are some practical options (and some pro tips) for creating better DIY video content.
1. Record to Camera with Your Webcam, Tablet or Phone
This is one of the simplest ways to create professional-looking video content without any special gear.
It’s perfect for:
- Explaining a product or service
- Sharing company updates or insights
- Responding to news or trends
Keep your camera at eye level, look directly into the lens, and speak as if you’re talking to one person, not a crowd. You can record directly through tools like Zoom, QuickTime, or your device’s built-in camera app.
These videos feel authentic and personal, great for building trust with your audience.
2. Create Reels or Shorts on Social Media
Reels are short, vertical videos used on platforms like Instagram, Facebook, TikTok, and YouTube Shorts. They’re perfect for quick, eye-catching marketing content.
How to do it:
- Film vertically on your phone (9:16 aspect ratio).
- Keep it short, ideally under 30 seconds.
- Use built-in editing tools to trim clips, add captions, and overlay music.
- Include trending sounds or songs, the algorithm often rewards these.
- Use relevant hashtags and add your location for extra reach.
- Add an engaging caption or question to encourage comments.
If you want to level up, try using free editing apps like CapCut or InShot, which give you more control over transitions, text overlays and filters.
3. Use a Camera and Tripod
If you want more stability and quality, invest in a tripod and a decent camera, or even just a smartphone mount.
This setup is great for:
- Filming product demos on a table
- Creating tutorial-style content
- Talking head pieces for websites or YouTube
- A tripod removes the wobble, giving your content a more professional look instantly.
4. Screencasting for Demos and Tutorials
If you have a digital product, app or software, screencasting is an ideal way to build a video library of demos or “how-to” guides.
Tools like:
- Loom – simple, browser-based, records your screen and webcam together
- OBS Studio – free, open-source, great for longer or higher-quality recordings
- Camtasia – paid, with editing tools built in
You can then edit or trim your recordings, add annotations or voiceovers, and upload to your site or YouTube channel.
These don’t need cinematic quality, they just need to be clear and easy to follow.
5. PowerPoint or Keynote with Voiceover
You can create surprisingly polished videos using PowerPoint or Keynote.
- Build your slides as usual, then record a voiceover using the built-in “Record Slide Show” or “Record Slideshow Narration” feature.
- Once finished, export the presentation as a video file (MP4 or MOV).
This works brilliantly for:
- Pitch presentations
- Long-form training material
- Product overviews using brand imagery and templates
With good visuals and smooth transitions, it can look like a produced explainer video, especially if paired with background music and a clean voiceover.
Other DIY Video Options
Here are a few other approaches to consider:
- Podcast-style recording – use a simple mic and camera to record casual discussions.
- Time-lapse – show a process or event over time using your phone’s time-lapse mode.
- Stock footage editing – use royalty-free footage from sites like Pexels or Pixabay to create videos with text overlays.
- AI video tools – platforms like Pictory or Synthesia can generate videos using text prompts and avatars (great for explainer content or internal comms).
How to Make DIY Videos Look Better
You don’t need to spend a fortune to make your content feel quality, just focus on the fundamentals.
1. Good Audio
Invest in a small external microphone – wired or Bluetooth. Clear sound instantly improves production quality more than almost anything else.
2. Lighting
Even a simple webcam light or ring light from Amazon can make a huge difference. Avoid sitting with a bright window behind you or harsh overhead lighting.
3. Location
Film somewhere tidy and quiet. Avoid cluttered backdrops or noisy environments.
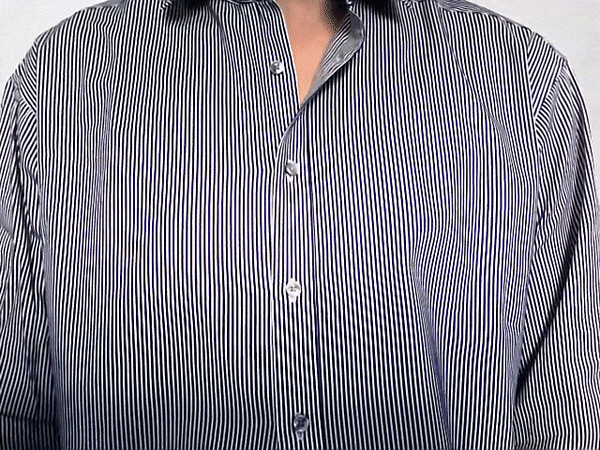
4. Clothing
Wear clothes that contrast with your background, and avoid tight stripes or fine patterns, they can cause a flickering effect on camera (called moire).
5. Aspect Ratio
Decide where your video will live before you start filming.
- 16:9 (landscape) – for YouTube, websites, and presentations
- 9:16 (portrait) – for Reels, TikTok, and Stories
- 1:1 (square) – for some social media feeds
Framing your shot correctly from the start saves headaches later.
6. Captions
Always include captions for accessibility and to improve engagement for viewers watching without sound. You can:
- Use tools like CapCut or Descript to auto-generate captions
- or upload an SRT file alongside your video on YouTube or LinkedIn
7. Quiet Space
Film in a calm, echo-free area. Soft furnishings or rugs can reduce echo if you’re recording indoors.
8. Planning
- Don’t wing it, but don’t script every word either. For talking to camera, jot down bullet points and record in short sections.
- For a narrated presentation or voiceover, script and rehearse for clarity and flow. Remember, you can always edit pauses or mistakes later.
When to Go Professional
DIY video is a fantastic way to produce content quickly and cost-effectively. But if you want high impact, high production value and the confidence that it will hit your goals, working with a professional video production agency will always deliver the best results.
It’s not just about the equipment, it’s about experience. Professionals know how to handle lighting, sound, editing and storytelling to make your brand look and sound its best.
Whether you’re starting small or planning your next campaign, there’s a place for both DIY and professional content in your marketing strategy, and knowing when to use each is where the real value lies.